
Dimension Engineering Switching Voltage Regulator Application Note
How to power wireless video camera systems with best results
Overview
This article will show you how to use a DE-SW050 voltage regulator to power a wireless video camera system in your R/C plane or car. This way, you can run a system with only one battery pack - you will not need to carry around a separate battery to power your video system. We will use a DE-SW050 because it can take a higher battery voltage and regulate it down to the 5 Volts that is needed by most wireless camera systems, such as ones offered by Black Widow A/V or Range Video. Some camera systems require 9V or 12V, and in this case you should use a different voltage regulator, such as the DE-SWADJ or AnyVolt Mini. For now, we will discuss a 5V system as it should work for most people.
Warnings and precautions
This article is aimed at R/C electronics lovers who are familiar with usage of a multimeter and understand the basics of volts, amps, watts and voltage regulators. Basic soldering skills are also necessary. The whole project can be completed in an hour or two. If you aren't comfortable with soldering then ask a more experienced friend to help!
How to power your 5V video transmitter from a higher voltage battery pack
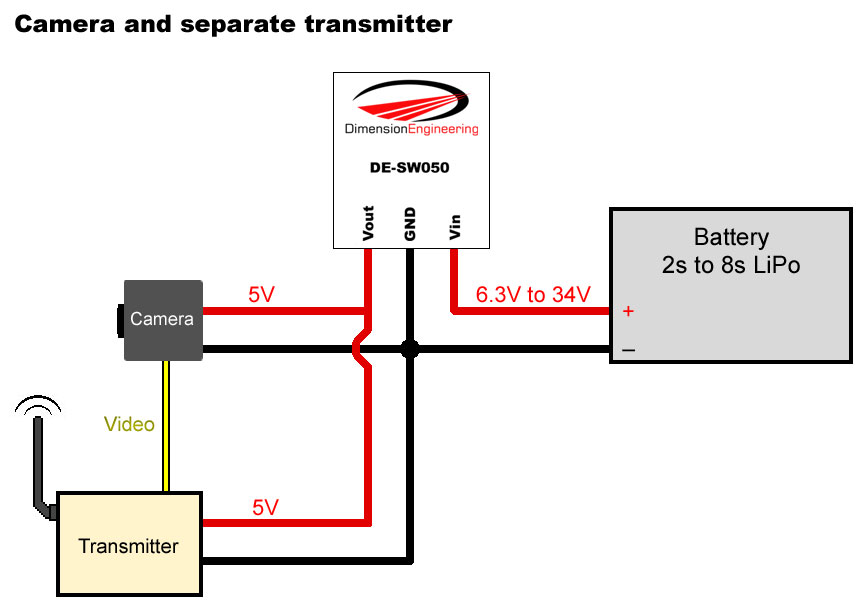
Most flyers these days use LiPo battery packs anywhere from 2S (8.4V fully charged) to 8S (33.6V fully charged). If you connect this raw battery voltage to your video gear you would kill your video system! What you need is a voltage regulator to take this high battery voltage and step it down to the 5V your system needs. The DE-SW050 is small, light and efficient enough to power multiple cameras and video transmitters. If you feed it a high battery voltage it will output 5V that you can use for your video gear. This diagram will how you how to wire things up:
Note how in this diagram there are essentially two wires being soldered to the GND pin on the voltage regulator. One is from the battery's - wire, and one is going to the camera's - wire. Because of this, we say that the battery and the video camera "share a common ground".
Some video systems comprise of a digital camera outputting a composite video signal and a separate transmitter that beams this video signal to a receiver. If they both run on 5V, then you can just put them in parallel like this:
This should be enough to get your video system working.
Problems with banding?
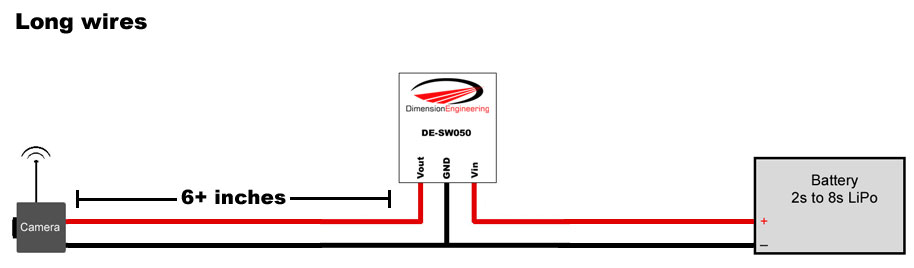
Some video transmitter hardware can be very sensitive to ripple. This means that the video transmitter's output can be affected by slight changes in the voltage it is being powered with. If you have long power wires (6 inches or more) then the problem can become worse.
The result is something like this, where you see some interference:
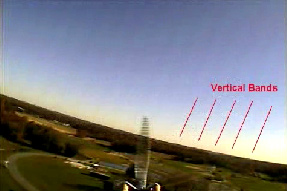
Slight banding is visible (Image courtesy Brian Renegar)
If you don't see any banding, then you can just skip the rest of this article and have fun flying. If you have problems with banding, here is how to fix it!
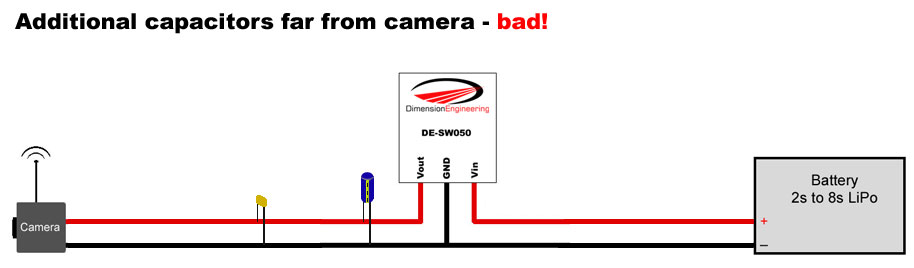
Adding a capacitor or two directly across the power wires of the camera/transmitter will help filter out ripple and improve the video quality. An electrolytic capacitor will help reduce ripple on the 5V line. Use something like 330uF or above. A 6.3V rating would be sufficient for 5V applications but a higher voltage rating certainly wouldn't hurt anything. You might also want to try a 0.1uF ceramic capacitor to filter out very high frequency spikes. The caps should be soldered as close as possible to the device - ideally across the solder points on the PCB.
 |
 |
An assortment of typical electrolytic capacitors |
A typical ceramic capacitor |
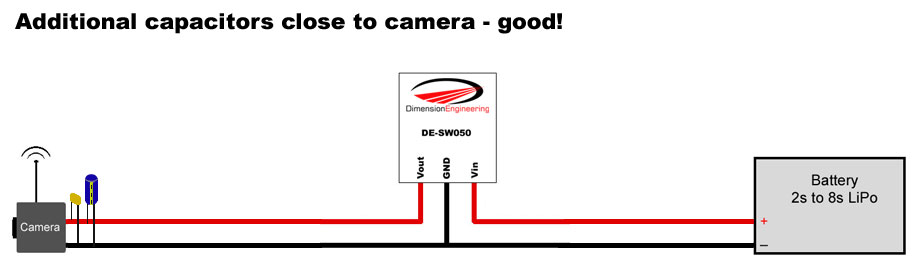
Make sure that you get the polarity right on the electrolytic cap or else it might pop! The negative side needs to be connected to GND/Battery - , and the positive side will connect to the +5V supply coming from Vout.
You might need to use one capacitor or the other, or possibly both depending on your situation. You might need to put caps on the camera or the transmitter module, or both. Experiment and find out which is the best solution for you!
As for capacitors to use, my recommendation would be to use these caps as they are small, light and cheap:
Digikey part # P12918-ND
"CAP ELECT 330UF 6.3V FM RADIAL"
Digikey part # 399-4264-ND
"CAP .1UF 50V 10% CER RADIAL"
You can find similar capacitors in any Radio Shack. The brand name isn't important.
Even more filtering
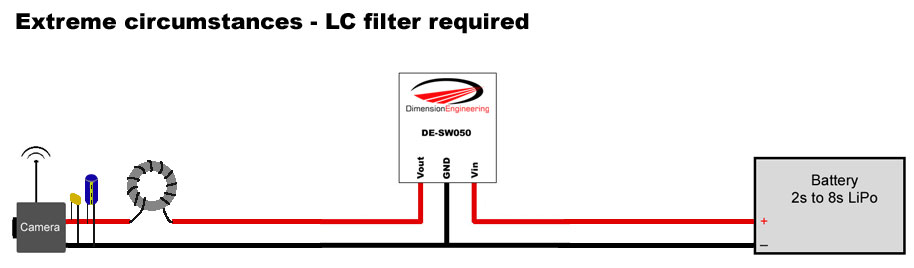
In extreme circumstances, you might need to add an inductor / choke in series with the 5V line, just before the capacitors and the camera:
Adding this inductor will create a filter that will drop ripple down to almost zero. Engineers call this type of filter a "low pass LC filter". A good inductance value to use is 10uH or higher. Winding the wire around some ferrite can also achieve the same effect.
Some possible inductor choices:
Digikey part # 237-1194-ND
"INDUCTOR 24.31UH TOROIDAL"
Digikey part # M8626-ND
"INDUCTOR HI CURRENT RADIAL 68UH"
Similar inductors might be called "chokes" or "coils" at Radio Shack.
If you still have video quality problems after you install the LC filter, then you might want to check on other things such as antenna polarization, keeping the transmitter away from other electronics etc.
Happy recording!
Back to Dimension Engineering